


Monday, June 30, 2014
Stryker (K.I.T.)

Stryker Tutorial
Open 700x700 (You can resize later) To aid in the creation of the tag, make your background white.
For the purpose of this tutorial, I will refer to the kit and tube I chose.
The kit I chose is Stryker by Kizzed by Kelz
Start by opening element 10 and placing it on the upper part of your canvas.
Next add element 24 where ever you would like on your canvas. I placed mine to the right.
Next I added element 29 and placed it to the left of the canvas, opposite of the casket.
Add element 9 by first, resizing then place it over the casket to make it appear like it is dangling.
Now add your tube!
This gorgeous guy is available now at Cano Tubes.
Next c/p element 27, so it covers the front of the tube.
Finally, add more elements to finish the look of your tag.
I used elements: 23 and 30 to finish mine.
Once you are happy with the layout of your tag, SAVE!
Don't forget to add any last minute drop shadows if you wish!
Resize tag if you would like as well!
Add Copyright information, your license and your favorite font for the name!
I usually save in .png but please save your final result in your chosen format.
All Done!
Please visit Created by Christie for links to extras
and information on how to request this tag (if offered).
This tutorial was written on 6/30/14 by Christie.
Any similarities to any other tutorial is purely coincidental.
All artwork and filters are copyright of the artists and filter creators.
All tutorials are created with PSP9 and are for those with a working knowledge of Paint Shop Pro.

Blue (Honored Scraps)

Blue Tutorial
Open 700x700 (You can resize later) To aid in the creation of the tag, make your background white.
Let's start making a tag!
For the purpose of this tutorial, I will refer to the kit and tube I chose.
The kit I chose is Scraphonored_IB-TiffanyTolandScott-31-1 by Honored Scraps
Start by opening element 07 and placing it in the center of your canvas.
Next open element 09 and move to the bottom of the flower.
Duplicate this element, flip and mirror.
Now you want to add your tube. Copy and paste your tube in front of the flower.
Now would be a good place to SAVE :)
Now start adding your elements to create your tag!
I used Elements:
04
05
06
12
Once you are happy with the layout of your tag, SAVE!
Don't forget to add any last minute drop shadows if you wish!
Add Copyright information, your license and your favorite font for the name!
I usually save in .png but please save your final result in your chosen format.
All Done!
Please visit Created by Christie for links to extras
and information on how to request this tag (if offered).
This tutorial was written on 5/9/14 by Christie.
Any similarities to any other tutorial is purely coincidental.
All artwork and filters are copyright of the artists and filter creators.
All tutorials are created with PSP9 and are for those with a working knowledge of Paint Shop Pro.

Sunday, June 29, 2014
Candy Pearl (Beehive Studio/Ninaste)

Candy Pearl Tutorial
Open 700x700 (You can resize later) To aid in the creation of the tag, make your background white.
For the purpose of this tutorial, I will refer to the kit and tube I chose.
The kit I chose is Kawaii Derzi Cane by Tiny Turtle Designs
Start by opening element 10 and copy and paste on your canvas. Duplicate, flip and mirror.
Next open element 8 and move it slightly to the right.
Using your magic wand select inside the frame and expand by 5 pixels.
Choose a paper of your choosing. I chose paper 6.
Copy and paste paper, invert and hit delete on your keyboard. Move below frame. Deselect.
Now you want to add your tube.
I am using Black Pearl (Candy Pearl Layer) by Ninaste at Beehive Studio.
Again with your magic wand select the inside of the frame and expand by 5 pixels.
Using a closeup of the tube of your choice, mirror and place it in the frame.
Invert and hit delete on your keyboard. You should only have the closeup of the tube in the frame.
Now you want to add your full tube. Copy and paste your tube to the left of the frame.
Now would be a good place to SAVE :)
Now start adding your elements to create your tag!
I used Elements:
51
57
58
77
78
86
93
104
109
131
178
180
Once you are happy with the layout of your tag, SAVE!
Don't forget to add any last minute drop shadows if you wish!
Resize tag if you would like as well!
Add Copyright information, your license and your favorite font for the name!
I usually save in .png but please save your final result in your chosen format.
All Done!
Please visit Created by Christie for links to extras
and information on how to request this tag (if offered).
This tutorial was written on 6/29/14 by Christie.
Any similarities to any other tutorial is purely coincidental.
All artwork and filters are copyright of the artists and filter creators.
All tutorials are created with PSP9 and are for those with a working knowledge of Paint Shop Pro.

Wednesday, June 25, 2014
Sweet Melissa (Honored Scraps)

Sweet Melissa Tutorial
Open 700x700 (You can resize later) To aid in the creation of the tag, make your background white.
For the purpose of this tutorial, I will refer to the kit and tube I chose.
The kit I chose is Sweet Melissa by Honored Scraps
This kit and more can be purchased at Treasured Scraps
Start by opening frame 04 and placing it in the center of your canvas.
Using your magic wand select inside the frame and expand by 5 pixels.
Choose a paper of your choosing. I chose paper 05.
Copy and paste paper, invert and hit delete on your keyboard. Move below frame.
Don't deselect.
Choose a tube and place in the frame in the center.
The tube I chose is Summer Girl from Anna Liwanag which was purchased from PTE (No longer open)
However, Anna now offers her artwork for purchase at CDO
Duplicate the tube and hide it.
With the original tube selected, copy and paste your tube into the center of the canvas.
Hit delete on your keyboard and deselect.
Unhide the duplicated tube and move to the top of the frame. With your eraser, remove any excess from the bottom part of the tube. See my tag for reference if needed
Next copy and paste element 11 between the tube layers *See tag for reference*
Now would be a good place to SAVE :)
Now start adding your elements to finish your tag!
I used Elements:
12
13
19
28
38
50
Once you are happy with the layout of your tag, SAVE!
Don't forget to add any last minute drop shadows if you wish!
Resize tag if you would like as well!
Add Copyright information, your license and your favorite font for the name!
I usually save in .png but please save your final result in your chosen format.
All Done!
Please visit Created by Christie for links to extras
and information on how to request this tag (if offered).
This tutorial was written on 6/25/14 by Christie.
Any similarities to any other tutorial is purely coincidental.
All artwork and filters are copyright of the artists and filter creators.
All tutorials are created with PSP9 and are for those with a working knowledge of Paint Shop Pro.

Sunday, June 22, 2014
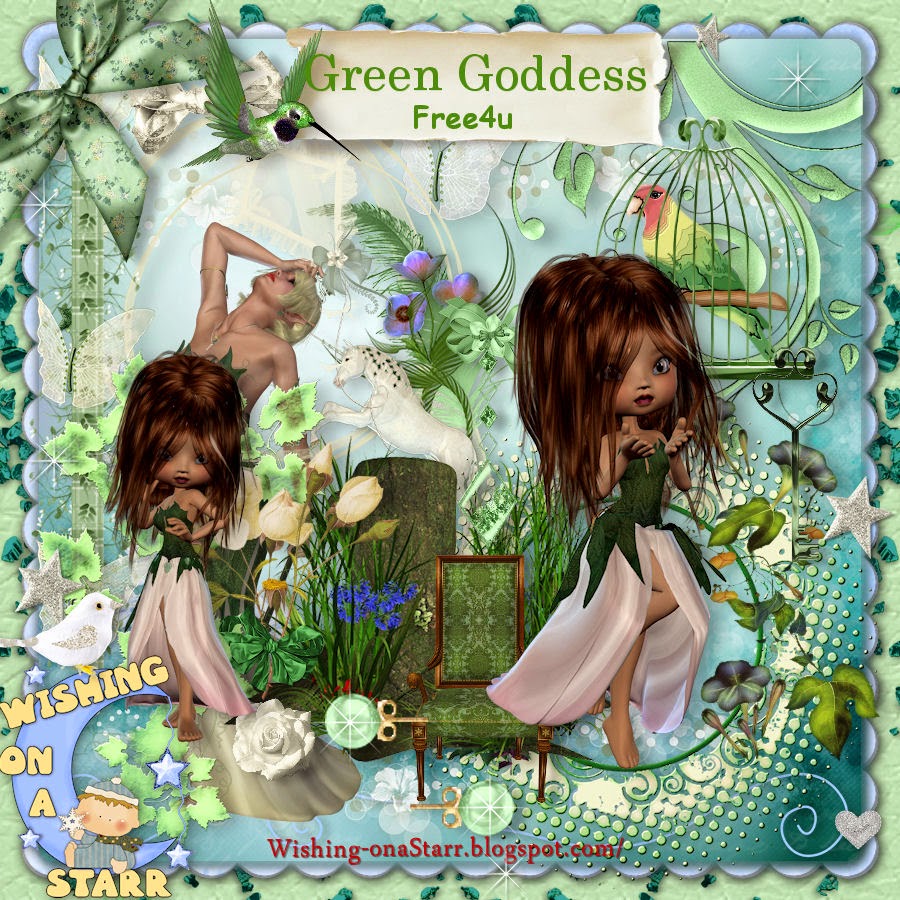
Green Fairy (AIL)

Open 700x700 (You can resize later) To aid in the creation of the tag, make your background white.
For the purpose of this tutorial, I will refer to the kit and tube I chose.
The kit I chose is Green Goddess by Wishing On A Starr
Start by opening Deco and placing it slightly left on your canvas.
For the purpose of this tutorial, I will refer to the kit and tube I chose.
The kit I chose is Green Goddess by Wishing On A Starr
Start by opening Deco and placing it slightly left on your canvas.
Next open the frame that looks like leaves and twigs in a circle and place it in the center of the canvas.
Next open the frame that has the dark flowers on the right side and the faded dots.
Place it in the center of the canvas.
Using your magic wand select inside the frame and expand by 5 pixels.
Choose a paper of your choosing. I chose paper 11.
Copy and paste paper, invert and hit delete on your keyboard. Move below frame.
Don't Deselect
Now you want to add your tube.
I am using Green Fairy by Linzi Sayles.
Her artwork can be purchased at Artistically Inclined Licensing.
Duplicate the tube and hide it.
With the original tube selected, copy and paste your tube into the center of the canvas.
Hit delete on your keyboard and deselect.
Unhide the duplicated tube and move to the top of the frame.
With your eraser, remove any excess you want from the tube. See my tag for reference if needed
Now would be a good place to SAVE :)
Now start adding your elements to create your tag!
I used Elements:
Arrangement
Bow
Calla Lily
Fantasy Boat
Floral Bow
Humming Bird
Once you are happy with the layout of your tag, SAVE!
Don't forget to add any last minute drop shadows if you wish!
Resize tag if you would like as well!
Add Copyright information, your license and your favorite font for the name!
I usually save in .png but please save your final result in your chosen format.
All Done!
Please visit Created by Christie for links to extras
and information on how to request this tag (if offered).
This tutorial was written on 6/22/14 by Christie.
Any similarities to any other tutorial is purely coincidental.
All artwork and filters are copyright of the artists and filter creators.
All tutorials are created with PSP9 and are for those with a working knowledge of Paint Shop Pro.
Next open the frame that has the dark flowers on the right side and the faded dots.
Place it in the center of the canvas.
Using your magic wand select inside the frame and expand by 5 pixels.
Choose a paper of your choosing. I chose paper 11.
Copy and paste paper, invert and hit delete on your keyboard. Move below frame.
Don't Deselect
Now you want to add your tube.
I am using Green Fairy by Linzi Sayles.
Her artwork can be purchased at Artistically Inclined Licensing.
Duplicate the tube and hide it.
With the original tube selected, copy and paste your tube into the center of the canvas.
Hit delete on your keyboard and deselect.
Unhide the duplicated tube and move to the top of the frame.
With your eraser, remove any excess you want from the tube. See my tag for reference if needed
Now start adding your elements to create your tag!
I used Elements:
Arrangement
Bow
Calla Lily
Fantasy Boat
Floral Bow
Humming Bird
Once you are happy with the layout of your tag, SAVE!
Don't forget to add any last minute drop shadows if you wish!
Resize tag if you would like as well!
Add Copyright information, your license and your favorite font for the name!
I usually save in .png but please save your final result in your chosen format.
All Done!
Please visit Created by Christie for links to extras
and information on how to request this tag (if offered).
This tutorial was written on 6/22/14 by Christie.
Any similarities to any other tutorial is purely coincidental.
All artwork and filters are copyright of the artists and filter creators.
All tutorials are created with PSP9 and are for those with a working knowledge of Paint Shop Pro.
Sunday, June 15, 2014
Believe (Honored Scraps)

Believe Tutorial
Open 700x700 (You can resize later) To aid in the creation of the tag, make your background white.
For the purpose of this tutorial, I will refer to the kit and tube I chose.
The kit I chose is Scraphonored_IB-JamieKidd-47-1 by Honored Scraps
This kit and more can be purchased at Creative Design Outlet
Start by opening paper 5 (I recolored it to a purple hue, but you do not have to)
Apply a mask of your choice. I chose MC_Mask3 from Melissaz Creationz. Merge Group.
Open element 15 and c/p above the mask. Duplicate and mirror and place it where you would like.
Now you want to add your tube.
Using a close up of your tube (*See Tag), place it in the center of your canvas.
Now would be a good place to SAVE :)
Open element 14 and resize 25%.
I duplicated the tube 2 times and placed it lower on my canvas kind of scattered.
Now open element 8 and resize 50%. Duplicate tube 3 times and place the flowers where you would like.
Open element 16, resize to your liking and place it where you would like.
I used it in between my flowers. *See Tag
Now start adding your elements to finish your tag!
I used Elements:
11
13
17
18
WordArt01
Once you are happy with the layout of your tag, SAVE!
Don't forget to add any last minute drop shadows if you wish!
Resize tag if you would like as well!
Add Copyright information, your license and your favorite font for the name!
I usually save in .png but please save your final result in your chosen format.
All Done!
Please visit Created by Christie for links to extras
and information on how to request this tag (if offered).
This tutorial was written on 6/15/14 by Christie.
Any similarities to any other tutorial is purely coincidental.
All artwork and filters are copyright of the artists and filter creators.

Thursday, June 12, 2014
Black Magic Woman (ScrapCandy)

Black Magic Woman Tutorial
Open 700x700 (You can resize later) To aid in the creation of the tag, make your background white.
For the purpose of this tutorial, I will refer to the kit and tube I chose.
The kit I chose is Black Magic Woman Scrap Kit by Sweet Tooth Studio
This kit and more can be purchased at ScrapCandy
Start by opening element 10 and placing it in the center of your canvas.
Using your magic wand select inside the frame and expand by 5 pixels.
Choose a paper of your choosing. I chose paper 8.
Copy and paste paper, invert and hit delete on your keyboard. Move below frame.
Next add element 3. Resize 50% and place below the frame. Erase any excess beyond the frame.
Open element 15, resize to your liking and place below the frame but behind the city.
Finally, add element 50, resize and place where you would like.
**See my tag for reference**
Now you want to add your tube.
I am using I Put A Spell On You by Elias Chatzoudis.
This tube was purchased at PTE (Closed) but can be purchased at EliasArtShop.com
Now would be a good place to SAVE :)
Now start adding your elements to create the rest of your tag!
I used Elements:
5
8
20
28
30
40
56
60
69
71
Once you are happy with the layout of your tag, SAVE!
Don't forget to add any last minute drop shadows if you wish!
Add Copyright information, your license and your favorite font for the name!
I usually save in .png but please save your final result in your chosen format.
All Done!
Please visit Created by Christie for links to extras
and information on how to request this tag (if offered).
This tutorial was written on 6/11/14 by Christie.
Any similarities to any other tutorial is purely coincidental.
All artwork and filters are copyright of the artists and filter creators.
All tutorials are created with PSP9 and are for those with a working knowledge of Paint Shop Pro.

Tuesday, June 10, 2014
Darkness Falls (ScrapCandy)

Open 700x700 (You can resize later) To aid in the creation of the tag, make your background white.
For the purpose of this tutorial, I will refer to the kit and tube I chose.
The kit I chose is Darkness Falls by MistyLynn's Creations.
This kit and more is available at Scrap Candy.
This kit and more is available at Scrap Candy.
Start by opening element 23 and placing it high left on your canvas.
Next add element 69, duplicate and mirror towards the bottom of the canvas.
Add a tree of your choice in the kit or use element 25 and place it to the left of the canvas.
Add element 65 and move it towards the bottom of the canvas.
Add element 38, duplicate and move the duplicated element slightly right and below.
It should look like this:

Add a tree of your choice in the kit or use element 25 and place it to the left of the canvas.
Add element 65 and move it towards the bottom of the canvas.
Add element 38, duplicate and move the duplicated element slightly right and below.
It should look like this:
Duplicate and mirror.
Now it's time to add your tube.
I chose tube 47-2 by Anna Marine. Her art and more can be purchased at CDO
Now it's time to add your tube.
I chose tube 47-2 by Anna Marine. Her art and more can be purchased at CDO
Now would be a good place to SAVE :)
Now start adding your elements to create your tag!
I used Elements:
16
18
20
29
40
42
45
50
51
52
Once you are happy with the layout of your tag, SAVE!
Don't forget to add any last minute drop shadows if you wish!
Add Copyright information, your license and your favorite font for the name!
I usually save in .png but please save your final result in your chosen format.
All Done!
Please visit Created by Christie for links to extras
and information on how to request this tag (if offered).
This tutorial was written on 6/10/14 by Christie.
Any similarities to any other tutorial is purely coincidental.
All artwork and filters are copyright of the artists and filter creators.
All tutorials are created with PSP9 and are for those with a working knowledge of Paint Shop Pro.

Friday, June 6, 2014
Long Gone (Honored Scraps)

Long Gone Tutorial
Open 700x700 (You can resize later) To aid in the creation of the tag, make your background white.
For the purpose of this tutorial, I will refer to the kit and tube I chose.
The kit I chose is Long Gone by Honored Scraps.
This kit and more can be purchased at Treasured Scraps
Start by opening element 6 and placing it in the center of your canvas.
Next open element 33 and place high left.
Add element 18 and place it over the moon wherever you would like.
Next open element 55 and place it where you see fit. Now add element 9 and place it to the right.
Place element 21 also to the right. In the same are, please add element 59 and duplicate.
Mirror the duplicated layer. Remember you can adjust the elements to make the tag your creation!
This would be a good place to SAVE!
Nex we're goig to add element 56. Once you place it where you want, duplicate and mirror.
Now you want to add your tube.
Now you can start filling in your creations with different elements.
The elements I used are:
1
11
34
37
39
41
44
61
Once you are happy with the layout of your tag, SAVE!
Don't forget to add any last minute drop shadows if you wish!
Add Copyright information, your license and your favorite font for the name!
I usually save in .png but please save your final result in your chosen format.
All Done!
Please visit Created by Christie for links to extras
and information on how to request this tag (if offered).
This tutorial was written on 6/6/14 by Christie.
Any similarities to any other tutorial is purely coincidental.
All artwork and filters are copyright of the artists and filter creators.
All tutorials are created with PSP9 and are for those with a working knowledge of Paint Shop Pro.

Love Rock (ScrapCandy)

Love Rock Tutorial
Open 700x700 (You can resize later) To aid in the creation of the tag, make your background white.
For the purpose of this tutorial, I will refer to the kit and tube I chose.
The kit I chose is Love Rock by Creation by Sanie.
This kit and more can be purchased at Scrap Candy
Start by opening frame 3 and placing it in the center of your canvas.
Using your magic wand select inside the frame and expand by 5 pixels.
Choose a paper of your choosing. I chose paper 01.
Copy and paste paper, invert and hit delete on your keyboard. Move below frame.
Don't deselect.
Now you want to add your tube.
Duplicate the tube and hide it.
With the original tube selected, copy and paste your tube into the right side of the canvas.
Reduce image by 50%
Reduce image by 50%
Hit delete on your keyboard and deselect.
Unhide the duplicated tube and move to the left of the frame. With your eraser, remove any excess from the bottom part of the tube. See my tag for reference if needed. SAVE!
Now start adding your elements to make your tag your own!
I used Elements:
Diamond
Glass
Love Rock Wordart
Music
Music Note
Music Note Swirl
Musical Heart
Scatter
Speaker
Skull
Once you are happy with the layout of your tag, SAVE!
Don't forget to add any last minute drop shadows if you wish!
Add Copyright information, your license and your favorite font for the name!
I usually save in .png but please save your final result in your chosen format.
All Done!
Please visit Created by Christie for links to extras
and information on how to request this tag (if offered).
This tutorial was written on 6/6/14 by Christie.
Any similarities to any other tutorial is purely coincidental.
All artwork and filters are copyright of the artists and filter creators.
All tutorials are created with PSP9 and are for those with a working knowledge of Paint Shop Pro.

Subscribe to:
Posts
(Atom)